Need user insights? Get the Playbook 📕
Asking good questions matters. It makes or breaks user research. What to ask, how to ask, when, whom, and why—are fundamental points to think through in advance. Whether you're considering moderated user interviews, contextual inquiries, unmoderated user studies, user observations, or other, the Research Tasks within your UX Research Protocol are critical to get right.
Work smarter, not harder.
The Turbo UXR Playbook is your tactical reference 👇 guide — free to download!
Get the Playbook
Learn More
Until this point, you've probably met with your internal stakeholders a few times to formulate an effective UXR project brief. From that you've begun to write out the components of a research protocol. Now, we're staring at the blank page of the heart of the matter ❤️... the Research Tasks. These might also be referred to as user tasks, interview plan, study guide, user questions, interview protocol, test plan, research guide, etc. For our purposes, we'll stick with the phrase Research Tasks. This is because Research Tasks can accommodate a wide range of UX research methods.
In this article, we'll define what Research Tasks are, and describe why it's beneficial to adhere to common framework. We'll share our 6-step guide to writing Research Tasks, and provide 7 tips for writing them in specific detail. After this, you might feel comfortable tackling how to write user stories from insights you've gathered as a result, or learn how to approach user insight storytelling, as a fast-follow.
For now, let's start with our preparation process by learning how to draft excellent UX Research Tasks ✏️.
user tasks research protocol interview guide test plan research plan user observation task plan stakeholder collaboration user research contextual interviews low-fidelity prototyping research script
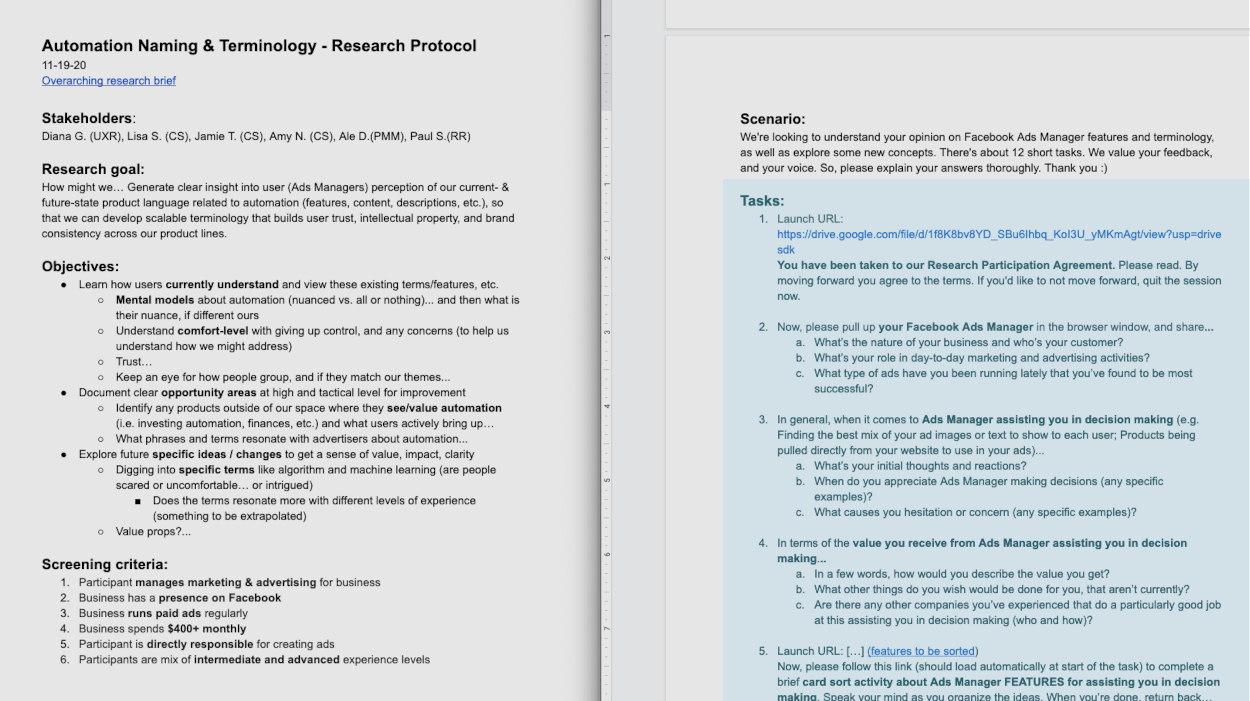
UX Research Tasks are one of the 3 unique components of a research protocol. They make up a major portion of the protocol, and are the most valuable part which meaningfully moves the process forward. Besides tasks, the protocol will outline the project stakeholders, goal, objectives, timeline, participant screening criteria, and scenario. These are all setup and context for the Research Tasks.

Research Tasks are defined as the specific phrasing for how the UX researcher elicits user feedback 💬 within their chosen research approach. If it's a user interview, then Research Tasks will be written in a format the UX researcher will read or scan during the interview. If it's an unmoderated user study, then they'll be written so that a user can read on their own to share feedback. Or if it's a user observation, they'll be drafted in a way that's more of an internal dialogue the UX researcher references to stay on track while observing.
The Research Tasks are oriented directly at conducting the research. They are the detailed questions to be asked in the live research situation. When the user / customer is sitting right in front of you, or you're on the product floor taking notes, Research Tasks are your best friend 😎😊.
Since so much emphasis is placed on the Research Tasks during the actual research moments, it's important to get them sorted ahead of time. There's generally not much free mental space to craft them on the fly, nor is it useful to do so.
So, let's break them down further before we help you build them up on your own.
Work smarter, not harder.
The Turbo UXR Playbook is your tactical reference 👇 guide — free to download!
Get the Playbook
Learn More
We've seen Research Tasks written out in many different styles. Some more structured than others. And to each their own. However, we've found over the years that being more structured 🏗️ leads to:
First, having a typical pattern to your Research Task flows will help stakeholders collaborate more effectively upfront. For example, through repetition of projects, they'll learn that the first few steps only deal with setup and context. Since stakeholders will want to share links 🔗, prototypes, and add specific questions, you can focus their attention towards the prototype and deep-dive steps. Over time, they'll learn where they can best provide input, and which steps are more suited for which UX research processes.
Second, adhering to a common framework helps to create a more balanced user research session throughout. It'll prevent placing too much emphasis on any one topic. The structure allows you to systematically work through the steps, adding questions and focal points, while avoiding overload 🏋️. Just as outlining is helpful in writing essays, articles, and novels, it serves an important purpose in Research Task writing. Even better that it makes things predictable and scalable as you repeat the process for every UXR project.
Third, following the 6-step guide (or something like it) improves the end-user (recipient) participation and outcomes from the study. We've built out these steps based on time-tested experience with moderated interviews. The 6-steps all serve a specific purpose to move the user through and properly focus their attention, all while giving ample opportunities to share feedback. Users like being guided in a predictable patter, not pulled about harshly / randomly. This structure helps them feel comfortable and confident when sharing 🙏.
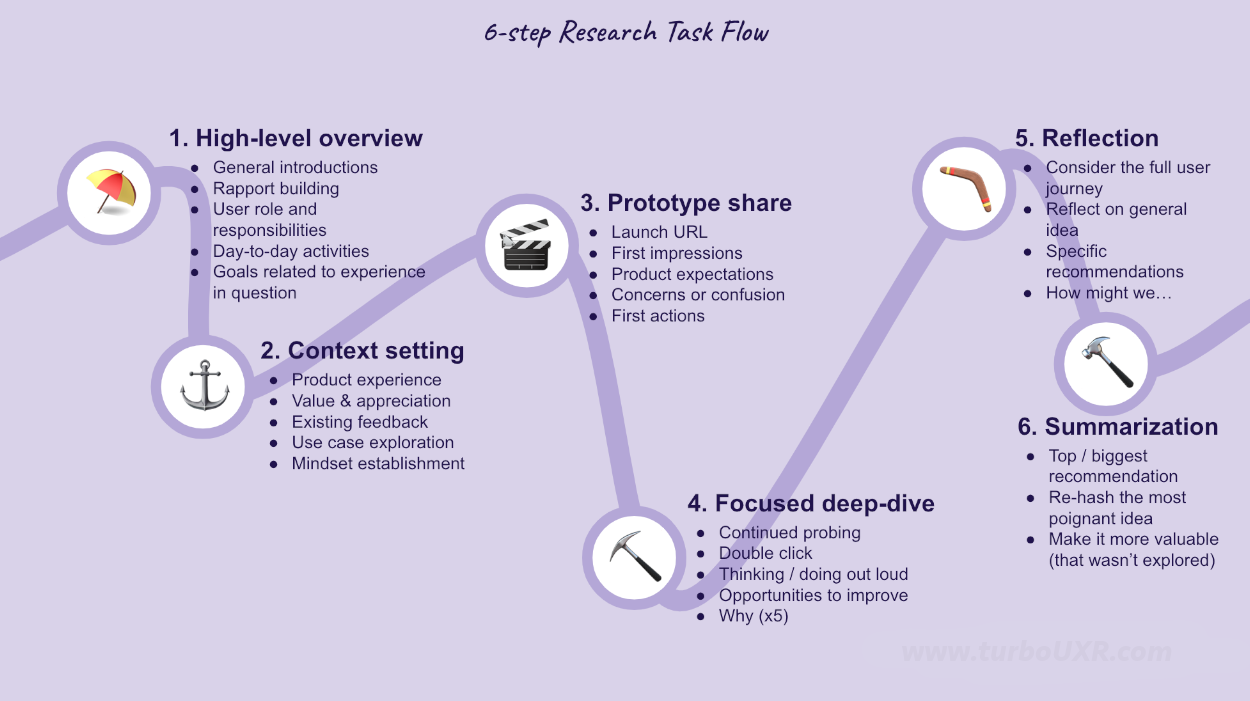
Now, let's walk through each of the 6-steps, their purpose, along with more details.

For fun, we'll use an airplane ✈️ analogy to describe the structure of our 6-step outline for Research Tasks:
In user interviews, be it moderated or un-moderated, the first few minutes are focused on breaking down barriers. The goal is to make things as comfortable as possible for everyone. We're setting the stage for diving deep into emotions, thoughts, feelings, ideas, etc. These things all live in a vulnerable place in the minds of most people / users. You can't just attack the core of the matter. Start small. Be personable. You'll have <5-minutes to establish a relationship 🤝 with the user.
For specific questions, we prefer ones that set the scope wide. We'll drill into the detailed ones later, but we like the user to share a little bit of their context. That way we know who were dealing with, and what they care about beyond our immediate product experience in focus. This can help later in data analysis process. You'll have a better sense of from where the user is coming. Choose questions that elicit a rough picture of the user's context, semi-related to the user experience in question. Some examples of topics to focus on include:
At this point, we'll start to steer more in the direction of the product experience for which we're researching. You've heard a little about their life, goals, and context. Now, let's click one more time into their perceptions of our product. The goal is to understand their experience level in their own words. Unpack their relationship with the product. Spend ~5 minutes listening 👂 to their product history, mindset, early feedback, etc.
For questions, choose ones that narrow more into what you as the UX researcher care about. Get a sense of their past, present, and future related to the product. Have them share examples. Have them speak to existing perceptions and feedback. Figure out what they appreciate already (see the importance of starting with positives in user insight storytelling) vs. broad aspects they wish to see changed (if anything). And importantly, put them in the mindset of where you're headed next, in terms of experience and questions.
A lot of the research we conduct will have some future idea in mind for which we're testing. Even if it's early stage generative research, it's helpful to bring along some visual artifact related to future ideas. A prototype (low-fidelity or high-) helps users understand we're looking to make changes. It gives them freedom to explore ideas about 'what if...', or 'what could be...'. In this phase, we'll orient questions around this shared artifact. The goal is to give additional structure and direction to the interview. Use the next 5–10 minutes to prime their ideation pump 🚰💧.
Questions to be used include ones that elicit first reactions. For example, have them visit the website in question... Give us a sense of what you're thinking when you first arrive. Tell us what you were expected vs. what you see now. Express any concerns or major points of confusion. Explain or show where might you go first, second, etc.
Step 4 is the main act of the show. This is where we've been diligently moving towards via the interview questions. You've got the user in the right mindset. You've given them a sense of which type of feedback is most valuable, and for what. They're loose and ready to share even more. The goal is to get a better sense for their perspective on where specific opportunities to improve exist. This can be explicit or implicitly stated. Spend 5–10 minutes digging deep ⛏️.
Gear questions towards further exploring the topic and experience at hand. Have them talk out loud while navigating. Tell us what they're seeing / not seeing / doing / not able to do. What do they wish was different. Why? Why? Ask why a few more times in different ways (i.e. 5-whys). Dig into their mindset, emotions, thoughts, actions, and reactions.
Ok, we've gotten somewhere. Somewhere interesting (hopefully). Time to back up a bit. The goal of this step is to reflect on what's been covered thus far. Get the user to recap their experience up to this point. Spend ~5 minutes asking for them to think 🤔 for you. It's surprising how much users will now understand what you're looking for, in terms of type of insight. They'll be able to tell you what stood out, what's most important to change, and why.
Orient questions towards reflection of self and user experience. Have them consider the full experience. Get them to provide feedback on the general idea, and specifics that stood out along the way. Ask for their top few recommendations or areas of opportunity. Get them to begin solutioning for you by asking, 'How might we solve for... X, Y, or Z?'
We're on the home stretch. By now you should have milked this session for 90% of it's worth. No stones left unturned. The user has shared, shared some more, and then recapped what they shared with you. It's time to ask them to summarize it all down to the most significant point, one last time. Spend ~5 minutes asking them to reiterate their tastiest piece 🍕 of feedback. Be it confusion, challenge, big idea, etc. The goal is to have them begin your analysis work for you.
Leverage questions that have the user restate the obvious. Sometimes this makes for the best sound bites, after the fact. Have them tell you what was their top recommendation to improve, from all previously expressed. Get them to re-hash their most poignant idea one final time. Ask them to consider things from your perspective and share something perhaps we haven't yet thought / talked about. End by inquiring into what would make things even more valuable, that hasn't been covered.
A final point about specificity in our work... Our approach to Research Task writing is as if we're always intending to launch to an unmoderated user panel. This holds true even when we're planning on using them for moderated interviews, observations, or other. This is because we craft Research Tasks to stand alone on their own. Our process doesn't require a UX researcher to be present to interpret and/or manipulate them accordingly. Tasks are written clearly, succinctly, and thought through carefully enough so that anyone internally or externally can easily follow along 🤓.
Now, you might want to keep your tasks fast and loose. That's fine. Your choice. But it's not our style. We appreciate specificity.
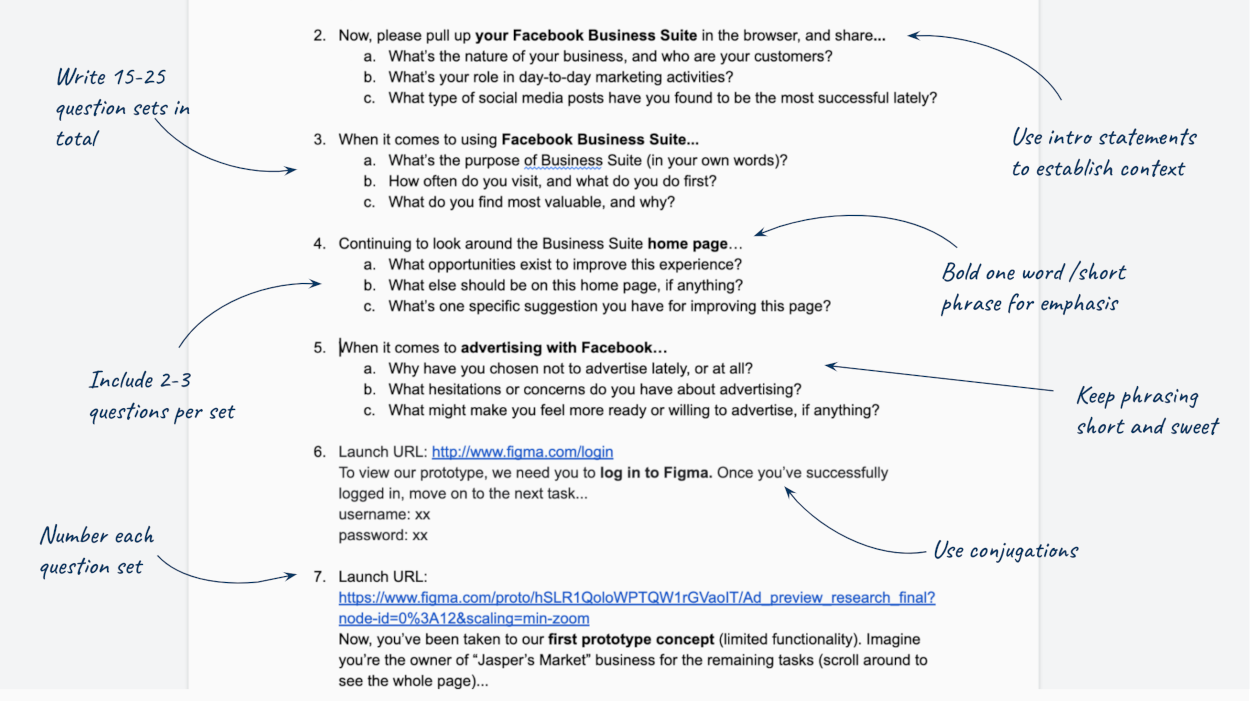
For Research Tasks, the devil's in the details. Since it's basically a script... flow, transitions, word choice, length, and content all matter equally. We feel strongly that it's important to take your time in writing and editing these tasks. It'll make all the difference in later stages. Therefore, we have a 7 detailed tips to share, as a last hurrah!

7 detailed tips and tricks for writing Research Tasks:
For more tips on writing actual interview questions, check out our specific article focused on how to best craft questions for user interviews.
Back to top ⤴
Work smarter, not harder.
The Turbo UXR Playbook is your tactical reference 👇 guide — free to download!
Get the Playbook
Learn More